
Trigger point release is a technique commonly used by physical therapists to address areas of muscle tightness and discomfort. It involves applying pressure to specific points, known as trigger points, within the muscle tissue. These trigger points are often tender to the touch and can cause referred pain or restricted movement.
Lacrosse balls are an awesome tool that can be used for trigger point release. Trigger point release is used to alleviate muscle tension and improve mobility by releasing tightness and restoring normal function to the affected muscles. By applying sustained pressure to these trigger points you can help relax the muscle fibers, improve blood flow to the area, and promote the release of tension.
For athletes, trigger point release can be particularly beneficial in enhancing mobility and performance. Tight muscles can restrict movement and lead to decreased flexibility, which can increase the risk of injury during physical activity. By addressing these areas of tightness through trigger point release, athletes can experience improved range of motion, enhanced flexibility, and reduced risk of injury.
Additionally, trigger point release can also help alleviate muscle soreness and fatigue, allowing athletes to recover more quickly from intense training sessions or competitions. This can ultimately contribute to better overall athletic performance and longevity in their respective sports.
Self-trigger point release with a lacrosse ball is a highly effective technique for athletes and individuals seeking to address muscle tightness and improve mobility on their own. Here’s a guide, on how to use perform self trigger point release:
Step 1: Identify the Trigger Points
Before starting, it’s essential to identify the trigger points in your muscles. These are areas that feel tender or tight and may refer pain to other parts of your body when pressed. Common trigger points include the upper back, pecs, shoulders, glutes, and calves.
Step 2: Positioning
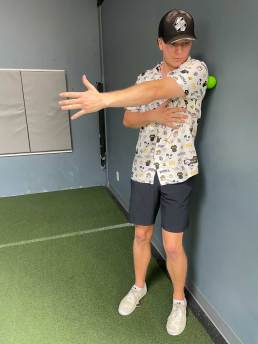
Place the lacrosse ball on the floor/wall and position yourself in a way that allows you to apply pressure to the targeted muscle. For example:
- For the upper back and shoulders: Lean against a wall and place the lacrosse ball between your back and the wall.
- For the glutes: Sit on the floor with the lacrosse ball under one buttock.
- For the calves: Sit on the floor with your legs extended and place the lacrosse ball under your calf.
Step 3: Apply Pressure
Once in position, gently lower your body weight onto the lacrosse ball, allowing it to sink into the muscle. You can adjust the pressure by leaning more or less into the ball and by using your hands and legs to control the intensity.
Step 4: Release
Once you’ve found a trigger point, you can either hold steady pressure on it or perform small movements to roll the ball around the area, exploring for any additional points of tension. Focus on breathing deeply and relaxing into the pressure to encourage the muscle to release.
Step 5: Duration
Hold pressure on each trigger point for about 30-60 seconds, or until you feel a noticeable release in tension. You can then move on to other trigger points in the same muscle group or switch to another area of the body.
Go give it a try!

Why the Mental Game Matters: An Intro to Mental Performance in Baseball, Softball, & Beyond
Learn how mental performance training improves focus, confidence, and resilience in baseball, softball, and other competitive sports.
Trends Among Young Baseball Players: A Focus on Functional Strength Training & Longevity
Joe Musgrove of Symbiotic explores the latest trends in baseball training for young athletes—focusing on functional strength and longevity.

My Journey to Team USA: How I Made it
Professional softball player Ali Aguilar shares essential advice for young athletes aspiring to represent Team USA.